Preserving White in Watercolour (7 Reasons You DON'T Need Masking Fluid)
Disclosure: This post may contain affiliate links. That means if you buy something we may possibly get a small commission at no extra cost to you.
Did you know that there are at least 7 reasons you DON’T need masking fluid?
Its awful stuff, but luckily there are many alternatives to the dratted masking fluid that allow you to preserve the white space in your watercolour paper with ease.
Discovering that white paint is not typically included in a watercolour paintbox can cause some alarm for a new painter! 😱 Alas, the white of the paper must be reserved and NOT painted!
After a little frustration with wilful watercolour that seems to go where it pleases, the new painter inevitably discovers masking fluid and believes their problems are over!
Alas… this is usually NOT the case
In my experience most watercolour painters fall into two camps
those that are ready to try masking fluid and
those that are disappointed with masking fluid.
Whichever of those camps you happen to fall into, dear Reader, I think it is only fair to let you know that there are at least 7 alternatives to masking fluid that will help you achieve white highlights in your watercolour painting, without using any sort of white paint. Before I get to those, let me share my thoughts on why Masking Fluid is more painter’s bane than salvation.
3 Reasons to Avoid Using Masking Fluid in Watercolour Painting
If you are a detailed, realistic painter with a lot of patience, masking fluid is perhaps an aid. But if you are anything like me it is a right palaver that creates more problems than it solves.
For Instance:
Masking Fluid Ruins Brushes
Smelly gloopy stuff like masking fluid ruins your brush! Hopefully you learn this before you dip your beloved paintbrush into the masking fluid. So at the very least you now need an extra tool on hand. A very old brush, a stick - yes a skewer or something might work, a rubber spatula that is small enough or generally any kind of applicator that you are not too fond of.

Masking Fluid Requires Excessive Planning and Patience
Masking fluid requires planning and patience. You will have to figure out where all your highlights need to be and mask them all out after any sketching but before starting to paint. Then you have to wait until it is completely dry before you can start painting.
If you have an attention span like mine, you probably started a Netflix binge session right after you struggled to get the lid off the dratted masking fluid before and now painting seems too hard.
Masking Fluid Creates Unnatural Hard Edges and More Risky Work
After your painting is dry you have to remove the masking fluid. Another fairly tiresome and slightly messy step in my opinion.
And thats when you see that your nice loose painting has these very formal hard edges wherever the masking fluid was (assuming you got it all off ok).
Now you can probably soften them, but this path is fraught with danger. applying a damp brush to soften edges in a dry painting requires a bit of skill and practice. It is quite easy to introduce a cauliflower or bloom at this stage. And it is also easy to end up with a bit of an overworked painting.
But perhaps it’s just me.
Fairness disclaimer : masking fluid is now available in pens, like an acrylic paint pen sort of thing which does make it a little easier. That solves problem one in my list above… but not the rest.

Luckily there are many alternatives to masking fluid. Each has its pros and cons of course, but if masking fluid is causing you any frustration please don’t think it's your only option!
Here are 7 alternatives to masking fluid (none of which involve white gouache paint).
And if you are wondering, number 4 is my personal favourite.
Masking Fluid Alternative 1: Just Dont Paint the white parts (highlights).
Masking fluid is like a vote of no confidence in yourself, I think.
The point is to just leave a little bit of unpainted paper showing, right? Well you can do that!
If you know that you want a nice highlight, say on the top of a person’s head, just paint in the dark side of the spherical head first, gently blend it out and stop before you get to the highlight edge.
It sounds scarier than it actually is. Remember its just paint and paper. If you mess it up you can fix it. Or just paint another. Really, it will be just fine. You are more accurate with your brush than you think.
And if you want to try this out for yourself in a painting, I have a step by step tutorial that will show you exactly that.

Masking Fluid Alternative 2a : Blot the Colour
Ok so what if it goes a little awry and you end up with a whoosh of colour where you wanted a highlight. First, let’s remember why that happens. Watercolour paint stays where you put it if the paper is dry. It only moves with water.
So your highlight will only disappear if the paper was damp and the paint you applied connected with the damp section. Of course it will also disappear if you accidentally plonk a bit of paint where you didn’t mean to. That happens - we are just human.
When paint is still damp you can take a kitchen towel or any sort of absorbent cloth and blot it up. Press the dry towel into the area you wanted to be unpainted for a second or two and then lift it off. The paint is probably removed. The quicker you are blotting, the better this works.
The only other thing that might hamper your success here is if you happen to be using a very staining colour. All pigments are different. The label on the paint tubes will declare the degree of staining to be expected from the pigment. Or you will just find out when you try it out for yourself. Most of the time you can pretty much remove paint by blotting quickly. Tah-dah - highlight reinstated!
Masking Fluid Alternative 2b : Lift the Colour
Another term you will hear is ‘lifting’. Lifting colour describes taking a clean damp brush and dampening an area you want to return to white. If the colour is non-staining this can be done even after the paint is dry. This is because one of the properties of watercolour is that it reactivates with water. So if we want to pick that highlight out of the head of the child we were using as an earlier example, we would just use our clean damp brush to gently agitate the highlight area. Give the paint a few seconds to soften up and then blot it out with the kitchen towel.
Sometimes you can lift colour with what we like to call a ‘thirsty brush’. If the paint is damp either because you just painted it or because you just reactivated dry paint with a damp brush you can take a dry (thirsty) brush and press it into the area you want to lift colour from. The dry brush naturally soaks up the paint and removes it from the paper. (As long as it is not a very staining colour). Sometimes you can do this to varying degrees ie to just slightly lighten a section rather than returning it to white.
Masking Fluid Alternative 3 packing tape
Now this alternative is a bit newer to me. Still a bit of a pfaff if you ask me but anything is better than masking fluid in my book.
Believe it or not, good old packing tape, either the clear or brown one, removes cleanly from the watercolour paper. So you can tape down sections that you want to mask and obviously the paint will not be able to get to that surface of the paper. You can also use a craft knife to very carefully cut around shapes in the masking tape. Usually you can see through the tape which is another bonus here. That means you can stick a bit of tape over your leaf/flower/child’s head that you are painting and then cut around the outside of the shape you want to mask so that you can pull off the excess.
Once the paint is dry you can pull off the packing tape to reveal the white shape below without damaging the paper.
Masking Fluid Alternative 4: Wax
Now this is one of my favourites. You can get a wax resist crayon (colourless) from some art supply stores. But you can also just use a bit of candlewax. I used a birthday candle, you know the skinny kind meant for the top of a cake, for many years before I found the crayons.
I love the wax because it is fun to use - like a kids wax crayon. I love that it gives you a soft organic edge to the highlight section as opposed to the hard lines left by other masking methods. This is much more in keeping with my loose painting style. And there is such a tactile delight in running the waxy crayon over the textured surface of the watercolour paper.
That is part of the danger though. Don’t get too carried away because the wax cannot be removed. Once you put it on your painting you are committed to a white highlight right there and you will not be able to cover it with paint (obvs).
Want to try this out in a painting? I have a few step by step tutorials using the wax technique that you might enjoy. Like this one…

Masking Fluid Alternative 5 Scratch
One way to make a very fine white highlight is to gently scratch out the paint with a sharp craft knife. You are slightly damaging the paper here but as long as you don’t slice right though the page this method might give you the fine lines you are looking for. Like, say for cat’s whiskers.
The effect is most pronounced on a dark cat. This is obviously true for any white highlight achieved by any method. You are going to see it with the most impact if it is adjacent to a very dark area.
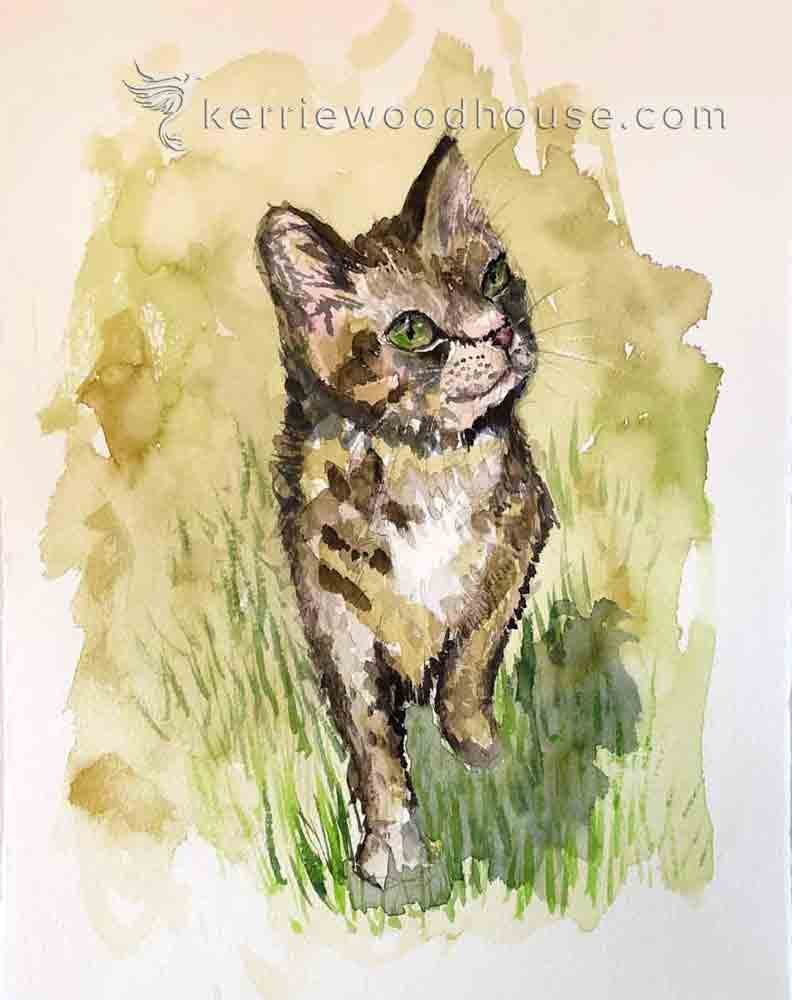
The whiskers in this cat were scratched out with a craft knife once the watercolour was dry.
With the tip of a sharp knife (or even say a sharp toothpick) you can flick in the whiskers with much the same action you would use if you were drawing them with a pencil. The sharp tip of the knife will take the very top fibres of the paper and the paint thats on them out, leaving a white mark beneath.
Masking Fluid Alternative 6 Eraser Sponge for Cleaning
There are other ways to scratch the surface and reveal the white paper below. If you have one of those abrasive little white eraser sponges (brands may have different names in different countries of course) but I mean the ones that are made to take stains out of walls and other household surfaces.
Again you want to be gentle because you don't want a big hole in your paper but the slightly damp eraser sponge will remove your paint from the surface of the painting.
Masking Fluid Alternative 7 Bleach
While we are in the cleaning supplies cupboard, you might want to grab a little bleach. Now of course you need to be a grown up when it comes to bleach, as you know. You have plenty of other alternatives but I include this final one in case it is something you fancy trying.
I like to use baby bottle sterilising bleach since it feels less aggressive and typically smells a bit better. Bleach will ruin your brushes too, so please don’t use your favourite for this!
You can paint a little bleach into any area you would like to be white. It will, unsurprisingly, bleach out the colour and make it white. You can try diluting the bleach a little too for fun effects.
And speaking of fun effects - if you have a tiny mister bottle and you put a little bleach in there you can spray it onto a dry dark wash for a galaxy effect. Make sure your mister produces a fine mist or you will just end up removing your painting completely! I use this with my Brusho watercolours. Sometimes the full effect of the bleach takes a minute or two so don’t give it a second spray too soon!
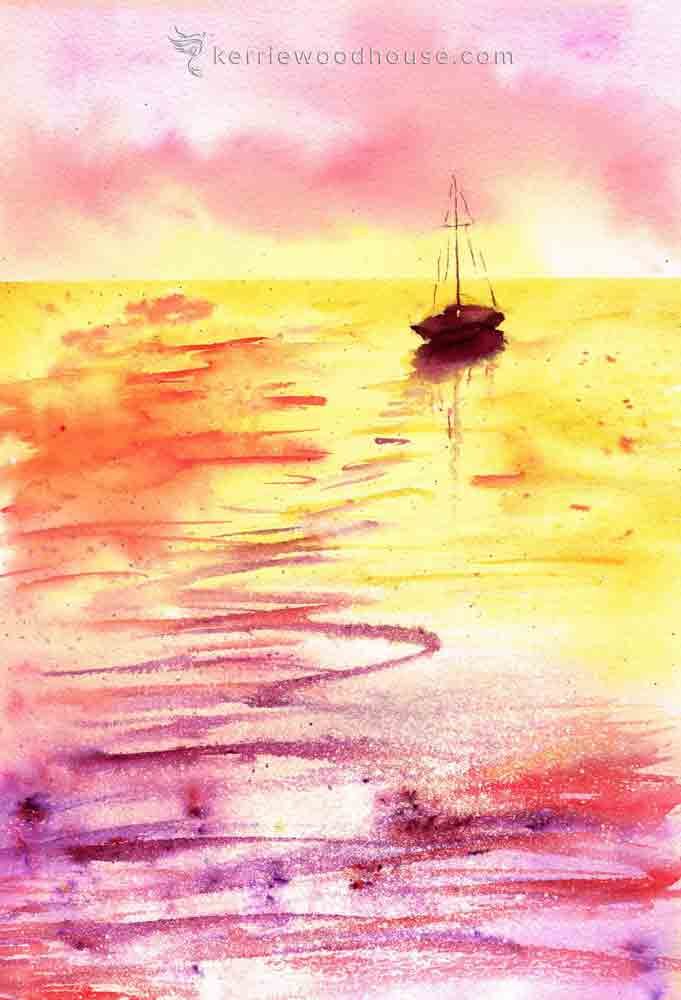
A spritz of baby bottle bleach created the sparkle on the water in the foreground of this Brusho Watercolour.
I do hope these alternatives to masking fluid have given you some fun options to try that will be way less bother!
And if you have questions about other sorts of watercolour supplies and what you ACTUALLY need to paint with watercolour, I have a whole class on watercolour supplies that is sure to answer them.
It’s free, and you can sign up here.

The Beginner’s Guide to Watercolour Supplies
Are you on your own painting journey?
One of these might be useful…


Keep on reading…